
Drawing a garden might be helpful if you want your children to enjoy nature or participate in gardening activities. Drawing a garden requires patience and practice. This skill helps children develop their artistic skills and imagination. It will also help them keep close to nature.
As a child, I drew gardens in my drawing book, but I don’t know how it was right because the internet didn’t exist back then. But lucky you can teach your kid how to draw a garden. This article will show you how to draw a garden using simple techniques.
Table of Contents
Why introducing your kid to gardening is essential?
- A garden can provide a place to relax and enjoy the outdoors.
- Gardens can help to improve your mental health and well-being.
- Gardens can provide a place to grow your fruit and vegetables.
- Gardens can help to attract wildlife into your outdoor space.
- Planting flowers and trees can beautify your home and create a beautiful landscape.
Your child should learn this very important lesson as early as possible. They must understand why they are planting things in the garden and that it takes time before some plants grow.
If this lesson isn’t taught properly, your child may become bored or even get scared of gardening. So, if you plan on starting a new hobby with your kids, introduce them to gardening early.
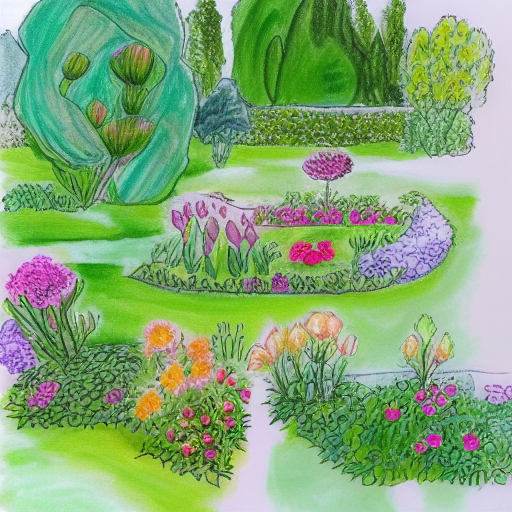
Here are some easy steps to drawing a garden
Drawing a garden is an enjoyable activity that requires patience and skill. Follow those steps to draw a garden.
Step 1: Start with a Plan
First, decide where to place the garden and what kind of plants you’d like to grow. Then, make sure you have enough space for the garden.
Step 2: Draw Your Garden Shape
Now, start sketching out the shape of your garden. You don’t have to be precise about your lines; make sure they’re straight and consistent.
Step 3: Add Details
Continue adding details to your design. Include shrubs, trees, flowers, fences, paths, and other garden elements. Try not to add too many features at once, though. Remember that you only need to include the essential shapes and details.
Step 4: Finalize Your Design
When you’ve finished adding all the necessary details, review your work. Does everything look right? If something doesn’t fit well, try adjusting it until it does.
Step 5: Sketch Out More Shapes
If you still need more detail, sketch additional shapes onto your plan. Don’t worry if you go over the original design. It’s better to err on the side of caution than to miss a feature later.
Step 6: Use Colored Pencils
Use colored pencils to shade in areas of the garden that aren’t visible in your sketch. For example, shading around tree trunks makes them appear darker and more substantial.
Step 7: Finish Up
Once you’re done, scan the paper and print it out. Now, you can begin planting.
Conclusion: Drawing a garden isn’t difficult once you know the basics. Keep practicing, and you’ll soon become an expert gardener.
Things you can include in your garden drawing to make it more mesmerizing:
1. Formal gardens are ones with straight lines and symmetrical shapes.
2. Informal gardens are more naturalistic, with curved lines and plantings that appear to be “growing” into one another.
3. Japanese gardens are characterized by using stones, water, and plants to create a tranquil space.
4. Cottage gardens are typically filled with flowers in different colors and textures.
5. Rock gardens feature prominent rocks or stones surrounded by smaller plants.
6. Herbaceous borders are usually full of colorful perennials.
7. Vegetable gardens feature rows of vegetables growing together.
8. Flower beds are generally filled with bright, colorful flowers.
9. Woodland gardens feature trees and shrubs planted close together.
10. Perennial gardens contain perennials year after year.
11. Container gardens are ones where the plants
How can you make your garden drawing more realistic?
1. Use a reference photo to help you plan your composition.
2. Pay attention to the light and shadow in your reference photo, and try to recreate them in your drawing.
3. Use a variety of pencils to create different effects – for example, a softer pencil for shading and a harder pencil for outlining.
4. Don’t be afraid to erase and redraw parts of your drawing if you’re unhappy with them. This is part of the creative process.
Which color is best for your garden drawing?
Crayons are a great way to add color to your garden drawing. They are easy to use and come in a variety of colors.
Adding color with paint: Paint is another great way to add color to your garden drawing. It is more difficult to use than crayons but provides a more vibrant color.
Adding color with markers: Markers are the most difficult way to add color to your garden drawing, but they provide the most accurate and vibrant colors.
Here are some tips for drawing gardens for kids:
When planning the layout of your garden, consider what plants will be best suited for each location. For example, sun-loving plants should be placed in an area that receives full sun, while shade-loving plants should be placed in an area that is shaded for part of the day. You’ll also want to consider the size of each plant when determining its placement.
Plants:
A wide variety of plants can be used in a garden drawing. If you’re unsure what plant to choose, go outside and look around. Which plant catches your eye? Select that one.
Colors and Textures:
Adding color and texture to your garden can make it fun and invite kids. Brightly colored flowers and foliage can add interest, while textured leaves or petals can add another dimension. Use grasses, gravel, pebbles, bark, sticks, twigs, and other items around your home.
Materials:
You don’t need expensive tools to draw a garden; just a few simple supplies will do. A pencil, eraser, ruler, compass, protractor, and graph paper are all you need to start creating your garden drawings.
Drawing Tips
Use these tips to improve your skills as a gardener:
1. Practice makes perfect. So, keep practicing until you feel comfortable with your drawing techniques.
2. When drawing something from life, take lots of pictures. Then, compare the pictures to see which looks like your subject the best.
3. Look closely at nature and notice details that others might miss.
4. Ask questions. Find out everything you can about your subject before starting to draw.
5. Be patient. Gardening takes time and practice.
6. Use a variety of media. Experiment with different mediums to find out which works best for you.
7. Don’t worry too much about perfection. Just enjoy yourself and have fun.
8. Have fun. Gardening is supposed to be enjoyable.
9. Share your work with family and friends.
Frequently Asked Questions [FAQs]
1. How Can I Draw A Garden?
To draw a garden, you can start by sketching the outline of the garden space using a pencil on a blank sheet of paper. Then, add various elements such as plants, flowers, trees, and other features that you want in your garden. You can find step-by-step tutorials on platforms like YouTube to learn how to draw a garden.
2. Are There Any Tips For Designing A Garden?
When designing a garden, it’s important to consider the size and shape of the space. You can use graph paper to plan your garden and measure the dimensions accurately. Additionally, researching different garden designs and exploring options like garden beds and pathways can help you create a beautiful and well-organized garden.
3. Can You Provide A Step-By-Step Guide To Draw A Simple Garden Plan?
Sure! Here is a step-by-step guide to draw a simple garden plan:
Start by sketching the outline of the garden space on a blank sheet of paper.
Add garden beds to mark the areas where you plan to grow different plants or vegetables.
Draw flowers, trees, and other decorative elements to enhance the overall aesthetic of the garden.
Use colors to add vibrancy and bring your garden to life.
Make sure to include a path or walkway for easy access.
4. Can I Use Colored Pencils To Draw My Garden?
Absolutely! Colored pencils are a great medium for drawing gardens, allowing you to add vibrant colors and shading to your artwork. Experiment with different color palettes to make your garden design more visually interesting.
Conclusion
We hope this lesson has helped you learn how to draw a garden. We wish you good luck on your next project. I hope you or your kid can make the drow garden more easily. So, what are you waiting for? Start drawing right now.